Introduction
Olive is the codename for JunOS running on a regular PC instead of a Juniper router. In this tutorial I will cover the installation of Olive in a VMware virtual machine. Using a virtual machine, abbreviated VM, makes it easy to implement a Juniper device to a virtual network. This is great for both learning and testing. I recommend using GNS3 for experimenting with virtual networks, this program also enables the use of virtual Cisco IOS appliances.
Note for Qemu (a VMware alternative) and Linux users: While this tutorial is meant for VMware users running Windows, there are two things you can learn from it. Firstly, set the VM’s memory capacity to 512 MB, this will prevent errors where the installer runs out of temporary space. Secondly, get the JunOS signature removal script (both Windows and Linux compatible) linked to under Requirements. Follow the included Read Me. Then transfer the modified file to the FreeBSD/Olive VM and jump straight to the pkg install part. The script automates the most tedious step and saves time and effort 🙂
This tutorial i based on:
http://routerjockey.com/2009/10/03/running-junos-under-vmware/
http://joost.blogsite.org/wordpress/?p=15
http://blog.ezzi.in/2010/12/installing-juniper-router-os-junos-101.html
http://www.gns3.net/phpBB/topic2840.html
I have added som tweaks to simplify the install and some troubleshooting tips for problems that might occur with recent JunOS versions. Some text might be similiar to the sources as I see no point in reeinventing the wheel 🙂
My specs:
VMware 7.1 and Windows XP SP3.
Requirements:
JunOS 10 or higher (can be gotten from torrent-sites)
FreeBSD 4.11
JunOS signature removal script (junos-auto-unprotect-v0.2 (Linux Win).zip by tranzitwww)
Quick ’n Easy FTP Server – To transfer JunOS over to the FreeBSD installation. If you already have an ftp-server, you can just use that.
Step 1: Setting up VMware
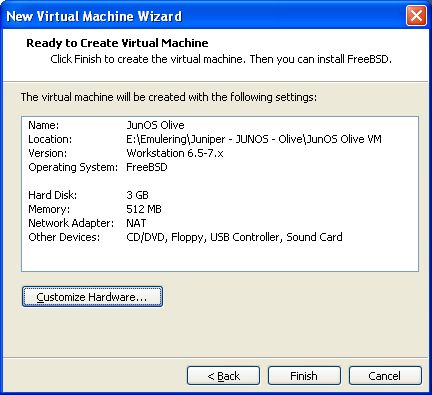
Choose the following menu options
- New Virtual Machine (VM)
- Typical install
- I will install the OS later
- Other, then FreeBSD in dropdown menu
- Choose a name (I used JunOS Olive) and install location
- 4 GB, Single file
- Click Customize Hardware:
- Set memory to 512 MB
- Set the network adapter to bridged mode
- Set the CD/DVD to use an .iso image and specify the FreeBSD install iso you downloaded
- Finish (Don’t start the VM yet)

Before we install FreeBSD we will tweak the VMware image a bit. Do the following:
- Locate the folder with the VMware image you just created
- Find the file ending with .vmx and open it in notepad
- Then change scsi0.present = “TRUE” to scsi0.present = “FALSE”
- Save the file and go back to vmware.
Step 2: Installing FreeBSD
- Start the VM
- Skip the kernel configuration
- Select the Express install option, you will now be taken to the partition setup
- Within fdisk, press A to allocate entire disk for bsd, then press Q to finish
- Select: install a standard MBR
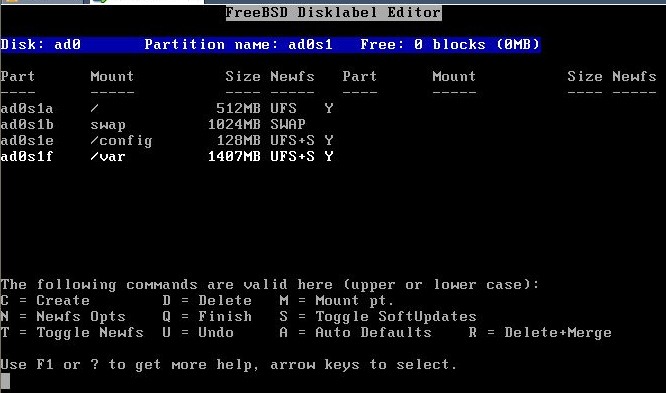
- Create partition (with C) :
- 512M for /
- 1024M for swap partition
- 128M for /config
- The rest for /var (this should be around 2400 MB)

- Press Q again to complete partition setup
- Choose installation type User and select No for FreeBSD ports
- X to Exit the menu and install from CD/DVD
- Wait…
- Select Yes for chance to set any last options
- Choose Root Password and type the password you want
- Now you can select X to Exit. It will now reboot
- Wait 5 sec and power off the VM and unmount the DVD by setting the virtual CD/DVD drive to use a physical device
Step 3: Prepare JunOS and setup FTP server
- Unpack the JunOS signature removal script
- Then find the JunOS install package (usually called jinstall-9.6R1.13-export-signed.tgz or similar based the version you have) and put it in the same folder (Windows) as the batch script
- Run the script (might need to run as admin on windows vista/7) and select the source .tgz file by typing the name of the jinstall (type ji and click tab to save time)
- The script will modify the install and create a new file with a name ending in olive. This is the file you want to tranfer and use in your FreeBSD VM
Now you should install and start the FTP server program.
- Click Launch User Account Wizard and set a name and password
- Then find the directory of the jinstall-olive image and set it as Home Directory
- Make sure the account has at least download priveliges
- Click the start button from the toolbar
Step 4: Transfer and install JunOS in your VM
Start the VM and login with root as username and the password you assigned. Now we want to retrieve the install over ftp so type the following commands:
ifconfig em0 <ip-address you want to assign the FreeBSD VM> e.g. 192.168.0.3, this should be in the same network as the ftp-server
cd /var/tmp
ftp <ftp-server ip-address> e.g. ftp 192.168.0.2
username: <username>
password: <password>
binary
get <jinstall-filename> e.g. get jinstall-7.2R2.4-domestic-signed.tgz
bye
At this point i recommend doing a snapshow of the VM. Go to the VM-menu, choose Snapshot and click Take Snapshot…
Now we will launch the JunOS install by executing the following command:
pkg_add -f /var/tmp/<jinstall-filename> e.g. get jinstall-7.2R2.4-domestic-signed.tgz
When complete you should choose not to reboot, we want to edit one last file so we can monitor the installation progress after reboot.
Excecute:
ee /boot/loader.conf
Find the line console=”comconsole” and set it to console=”vidconsole”
Press escape and leave editor. Remember to save 😉
This is a good moment to do a second snapshot.
Now reboot by typing reboot
FAQ: JunOS Olive Troubleshooting
All these questions have been addressed in this tutorial.
Q: During installation i get the following error:
WARNING: The /tmp/preinstall filesystem is low on free space.
WARNING: This package requires 265926k free, but there
WARNING: is only 208518k available.
WARNING: This installation attempt will be aborted. You are now
WARNING: in a debug shell. Type ^D to reboot the system
You are now in a debugging subshell (you may not see a prompt)…
A: Increase the memory of the virtual machine. The installer uses RAM memory for swap space and will fail if there is too little space available.
Q: During installation i get the following error:
ad0: 32768MB <vmware Virtual IDE Hard Drive 00000001> at ata0-master UDMA33
A: The simple fix for this is to edit the appropriate VMware configuration file ( whatever.vmx ) and change the line that reads scsi0.present = “TRUE” to scsi0.present = “FALSE”


